Setup a pfSense 1.2.X firewall when default gateway is on a different subnet

This article has been replaced by a new one using pfSense 2.0. The new setup is a lot simpler.
If you buy a VMware server and an IP block from OVH you will be surprised because the default gateway don't match the IP block. Even if this setup is unusual, it is valid and give full satisfaction.
There are some advantages to use this technique: this make the configuration of the hosting service provider routers a lot simpler (no need to setup an IP address for each underlying IP block, they can merge routes for adjacent IP blocks together) and the most important, this save one IP address.
Windows host accepts this unusual configuration and just work.
Linux host requires a little trick.
[root@fc6-pmx ~]# route add default gw 192.168.23.254
SIOCADDRT: Network is unreachable
Linux refuse to add the route because it don't know how to reach the gateway itself. Add the appropriate route for the gateway, before the default route, solves the problem.
[root@fc6-pmx ~]# route add -host 192.168.23.254 dev eth0
[root@fc6-pmx ~]# route add default gw 192.168.23.254
This works !
[root@fc6-pmx ~]# route -n
Kernel IP routing table
Destination     Gateway         Genmask         Flags Metric Ref    Use Iface
192.168.23.254  0.0.0.0         255.255.255.255 UH    0      0        0 eth0
10.0.0.0        0.0.0.0         255.255.255.0   U     0      0        0 eth0
0.0.0.0         192.168.23.254  0.0.0.0         UG    0      0        0 eth0
To configure a firewall, depending of the firewall, you will have to be imaginative !
How to setup a pfSense 1.2.X firewall
If you want to use a pfSense firewall to protect this range of IPs, you will need a big trick. Even if the Web interface allows you to setup the gateway on a different network, the underlying system silently rejects this configuration.
Routing basis
If we come back to the basis of ethernet and IP networking and of what is a gateway, we will find an easy solution.
Here is an IP packet embedded in an ethernet frame.

The gateway is not the final destination of the IP packet, it is only the next hop. Its IP address never show up in the IP header ! This is the underlying ethernet layer that stores the MAC address of the gateway in its destination field. The gateway receives the packet because of the matching ethernet address and forward it to the next hop using the destination stored in the IP header.
Look at this schema ! This is the schema I used for testing the configuration.

All the IPs are from the Address Allocation for Private Internets ranges, even if some are supposed to be real Internet addresses, but it was for testing !
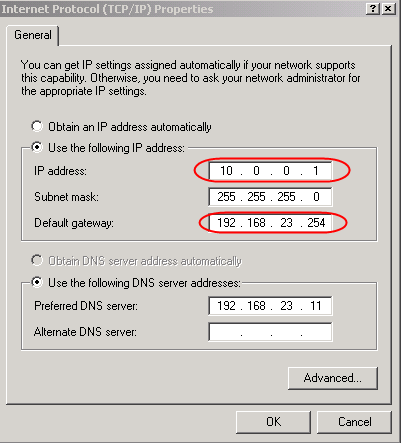
- 192.168.23.254 is the default gateway given by my provider.
- 10.0.0.0/24 is the IP block given by my provider. I assign it to my DMZ.
- 192.168.1.0/24 is a LAN, this is to complete the schema and make it usable when a LAN is required.
As said before, the IP address of the default gateway is not really necessary ! This address is not used by the routing process itself. Only its MAC address is really necessary to forward the packets to it. (I said it twice to be sure).
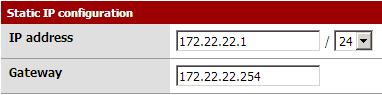
The WAN trick
The trick is to assign a completely unrelated IP address to the WAN side. I choose 172.22.22.1 and 172.22.22.254 for the gateway. Then I link this gateway address to the MAC address of the real default gateway using a static ARP entry. This way the firewall will not use an ARP request but use this MAC address and send blindly outgoing packets to the good default gateway ! The default gateway has no way to guess how difficult it was (we had to cheat) to send packets to it :-) and will forward them as expected.
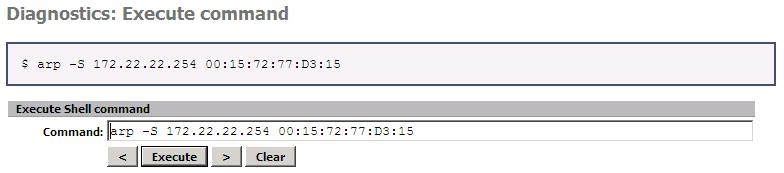
The usual command to setup a static ARP entry is :
# arp -S 172.22.22.254 00:15:F2:77:D3:15
To get this MAC address, you have no luck because pfSense don't have the required tools installed by default ! The last arping package is only for version 1.0.1 ! If you have already one working machine using this network, you can issue a ping to this gateway and then query your ARP table like this :
# ping  192.168.23.254
# arp -a -n    (don't use -n on Windows host)
? (192.168.23.254) at 00:15:F2:77:D3:15 [ether] on eth0
00:15:F2:77:D3:15 is what you are looking fore. Unfortunately VMware ESXi don't have the arp command ! But if you insall the VMware vSphere Command-Line Interface it is possible to get this address using the command :
# esxcli --server=your_server --username=root --password=your_password network neighbor list
You will get something like :
Neighbor        Mac Address       vmknic Expiry(sec) State
--------        -----------       ------ ----------- -----
188.165.xxx.250 00:30:48:XX:XX:62 vmk0   1171
188.165.xxx.254 ec:30:91:XX:XX:c0 vmk0   1183
If you cannot run this command, you will need a Linux or Windows OS already working inside your VMware host, maybe the one you are using to configure your pfSense :-)
You have to configure the WAN before to add the static ARP entry !
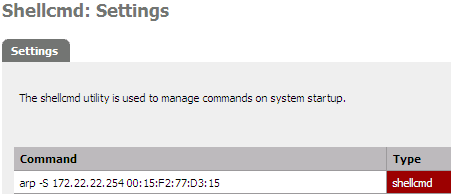
To setup the static ARP entry, you can type the command in your pfSense console or use the WEB interface like this :
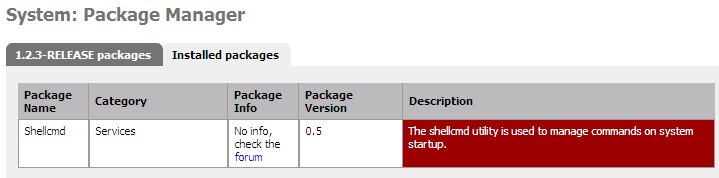
To hard-code the arp command, to have it working after a reboot, I will install the shellcmd package as soon as I have internet access !
And add this entry.
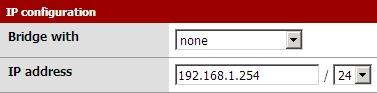
Here are the settings of my LAN in my pfSense firewall :
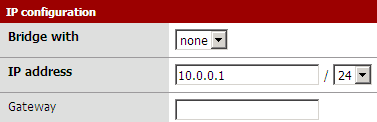
Then the settings of my DMZ (called OPT1 by pfSense) :
Setup the Proxy ARP
For packet coming or coming back from internet, the firewall will never answer to address 10.0.0.1 on the WAN side ! To force it to reply to ARP request for this address I have to add a Proxy ARP entry in my Virtual IP addresses.
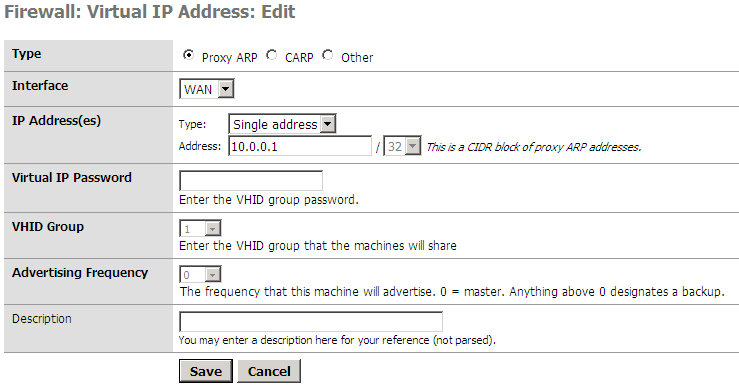
The address is attached to the WAN interface.
Masquerade the source address
But outgoing packets still leave the firewall with the wrong source address 172.22.22.1 and replies will never come back ! I need to masquerade the source address for outgoing packets ! First I need to disable Automatic outbound NAT rules generation in my pfSense firewall.
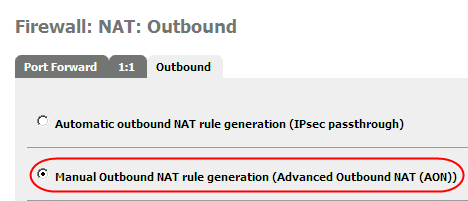
Then define the corresponding rules for the LAN and the firewall itself like this :

I can use 10.0.0.1 in this rule because I have already define a Proxy ARP Virtual IP !
Now, firewall and LAN can use the 10.0.0.1 to go out on the Internet.
The DMZ
I will assign the public address 10.0.0.2 to my virtual web server. First I create a virtual IP address like for 10.0.0.1 and all 10.0.0.X you want to use in your DMZ.
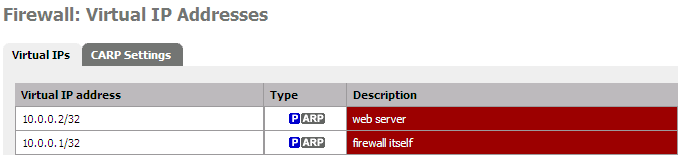
To use your DMZ you have to add fire-walling rules to allow packets to pass through between WAN and the DMZ (OPT1). Here for outgoing ...
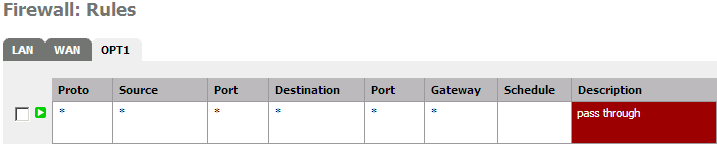
.. and here for incoming packets !
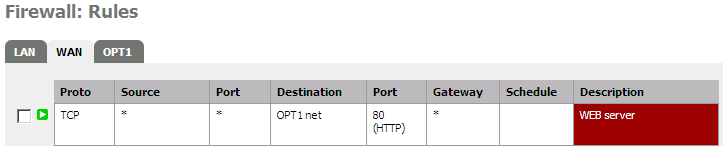 That's it ! Now, your WEB server is accessible from the internet and from inside your LAN. If you have a LAN and have to expose some internal resources, here the way.
The LAN
If you need to access some resources inside your LAN, you can easily NAT some ports of the address 10.0.0.1 to some of your internal hosts. If you need more addresses, add more Proxy ARP (identical to the one you have already setup above), and the appropriate Port forwarding rules ...

Double check if pfSense has added the equivalent filter rules and finally don't forget to setup the required outbound NAT rules to link your internal LAN address to the one you have setup in your Proxy ARP configuration.

That'it !
Add IP fail-over
If you need to manage IP fail-over inside this configuration, take a look at this post
Advantages of this configuration
The biggest advantage of this configuration is the use of routing instead of NAT to forward packets, this has a lot of advantages !
- this config provide a zone for your hosts in your DMZ and your LAN with usual network settings (a gateway in the same LAN subnet).
- this config is based on routing instead of NAT, this will avoid every inconvenient generated by the use of NAT when using fragile protocol like: ftp, pptp, ...
- NAT drop connections when not used for long time, routing don't require to maintains connections and then never drop anything.
- the hosts in your DMZ use the public IP addresses, this make things simple and avoid confusion.
- LAN access your DMZ using public IP addresses
- no need to define the NAT rules for each required ports, only the firewall pass through rules are required.
- reduce the MEMORY and CPU usage of the firewall.
Hope this help !
Free Front-end for popular Windows and Linux Backup tools.
Monthly archive
- January 2011 (4)
- February 2011 (10)
- March 2011 (6)
- April 2011 (1)
- May 2011 (1)
- July 2011 (4)
- August 2011 (6)
- September 2011 (5)
- April 2013 (1)
Comments
fxmx86 (not verified)
Wed, 01/26/2011 - 18:42
Permalink
Same pb with IPCop !
Je vais essayer ta solution pour ma VM IPCop :
J'arrive sans pb à modifier le fonctionnement pour un accès standard (la méthode que tu nommes "Linux host requires a little trick"). Par contre, le VPN me pose des soucis : du fait de cette modif, le VPN ipsec ne fonctionne pas (en fait, la route vers ipsec0 ne peut pas se mettre en place). Mais avec ta méthode "The WAN trick", cela va peut-être le faire ! Merci !
aspineux
Fri, 01/28/2011 - 11:22
Permalink
single point of failure
I thing the single point of failure is the way the system choose the source address for outgoing packets generated by the firewall itself. This is true for pfSense but for other firewalls too. I solve this in "Masquerade the source address". I have not tested if VPN works. Anyway because the DMZ is safe of all these tricks, everything should be possible there. If possible, you can try to setup another firewall dealing with VPN stuff inside the DMZ.
fxmx86 (not verified)
Fri, 01/28/2011 - 12:12
Permalink
Your ARP solution is ok with IPCop !
And the most important is that the RED network has the right format for IPCop so IPSec is now ok !
Thanks for your trick, very KISS compliant (très simple et fonctionnelle !)
A+
Franck78 (not verified)
Sun, 08/21/2011 - 18:19
Permalink
How to get ARP addresses from esxi without 'vcli'
How to get ARP addresses from esxi without 'vcli'
Unknown MAC is for IP 46.105.114.254
ssh your.esxi
#tcpdump-uw -etn host 46.105.114.254
ssh your.esxi one more time (easiest)
# ping -c 5 46.105.114.254
just read output !
00:25:90:47:5c:00 > 00:07:b4:00:04:01, 46.105.114.xx > 46.105.114.254: ICMP echo request

00:1e:13:f9:9b:00 > 00:25:90:47:5c:00, 46.105.114.254 > 46.105.114.xx: ICMP echo reply
Note the reply not coming from the same MAC !
I have solved temporarily the problem this way :
I have supposed the subnet for failover IPs is something like 87.98.128.0/19 and have a gateway somewhere in it.
So I just put the failover IP with /24 mask and 87.98.139.254 as gateway.
This worked perfectly.
Need to try with/find a gateway really correct though.
Like 87.98.223.254 with /19.
Franck
aspineux
Mon, 08/22/2011 - 14:58
Permalink
RE: How to get ARP without 'vcli'
(Notice: tcpdump is not available on original ESXi 4.0.0, you need at least SP1)
I'm looking at your tcpdump output
00:25:90:47:5c:00 > 00:07:b4:00:04:01, 46.105.114.xx > 46.105.114.254: ICMP echo request
00:1e:13:f9:9b:00 > 00:25:90:47:5c:00, 46.105.114.254 > 46.105.114.xx: ICMP echo reply
Both 00:07:b4:00:04:01 and 00:1e:13:f9:9b:00 are MAC addresses from a Cisco Systems, probably the same router with multiple NIC on the same network.
I thing both MAC could work, but the first one 00:07:b4:00:04:01 is probably the one your host has in its ARP table and then, probably coming from ARP request and then the one we are looking for.
Normally tcpdump show the ARP requests and responses too, then you should be able to see them. Wait some seconds for the ARP table to expire and redo a ping.
87.98.139.254 is maybe the machine of another customer like you ! Why 139 ? The last IP of the /19 network is 87.98.159.254.
Some peoples on the internet claim to have a .254 address in their failover addresses. Then be warned.
Thanks for sharing.
Corrine dipas (not verified)
Thu, 08/25/2011 - 13:11
Permalink
Greate article
Thanks a lot for this great article
Corrine Dipas
corrine.dipas@mail.com
Issac (not verified)
Mon, 08/06/2012 - 17:58
Permalink
Thanks for OVH dedicated server instructions
FWIW I've done the initial setup to access the webConfigurator as follows:
Go to shell (option 8 on console)
route add xxx.xxx.xxx.254 -interface em0
route add default xxx.xxx.xxx.254
This will set the routing tables (temporarily, as pointed out) to let me set any (valid) IP on WAN to go in and set things up. But in this case I need to use a temporary IP to use in the WAN so that I can set the final IP in the VIP settings. Also, for people reading this, when changing the WAN to a temporary IP as described above, don't "Apply changes" on the interface page until the very end as it will disconnect you.
Add new comment