Adding OVH fail-over IPs to our pfSense 2.X configuration

This setup is only valid for pfSense 2.0 configuration using routing instead of NAT like explained in this post. A version for pfSense 1.2.X can be found here.
IP Fail-over
Fail-over IPs are IPs that you can assign to any host servers you have with OVH. When the host fails, assign the IP to another one running the same service and OVH will route traffic up to this new host. This is your job to make your host and the firewall in front of it (if any) handle this extra IP. This help to guarantee continuity of service !
First remember the network schema I use for testing. I want to add the fail-over IP 192.168.168.2 to my WEB server running on 10.0.0.2.

I have 3 possibilities :
- Use 1 on 1 NAT between the two IPs
- Use port forwarding, port by port
- Use routing instead of NAT
1 on 1 NAT
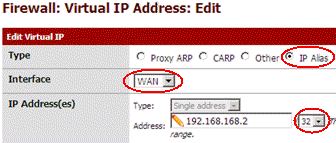
First, I create an IP Alias for 192.168.168.2 on the WAN side to allow the firewall to reply to ARP requests on this side:
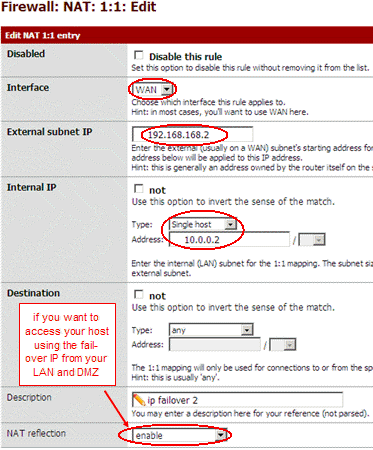
Then I create a 1 on 1 rule to forward traffic up to IP 10.0.0.2.
Now I have to update my filter rules to let traffic for this new address pass trough. I have two ways :
- I can duplicate each entries about 10.0.0.2 in OPT1 and WAN panels and replace the 10.0.0.2 by 192.168.168.2 in the new entries.
- Or, my favorite one, use host aliases !
Using aliases
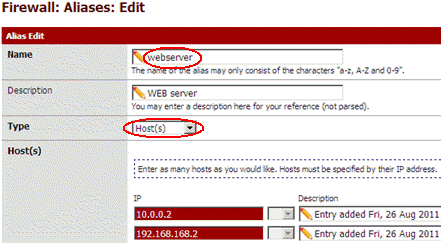
I create a webserver host alias and assign it both addresses : 10.0.0.2 and 192.168.168.2.
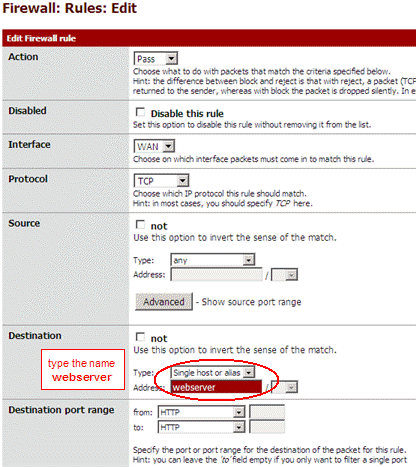
Then I use the name webserver instead of IP 10.0.0.2 in all my firewall rules :
Because this is NAT, you don't need to assign IP 192.168.168.2 to your host.
Port forwarding
I don't detail to much this solution, for short:
- Create an IP Alias for 192.168.168.2 on the WAN side (like in 1on1 above)
- Create a port forwarding rules to NAT HTTP traffic to 192.168.168.2 on the WAN side up to 10.0.0.2
- Be sure the NAT rules has also created the associated filter rule for HTTP traffic.
- If you need to access host 10.0.0.2 through IP 192.168.168.2 from your LAN or DMZ, you need to enable NAT reflection at bottom of the NAT rule.
If you need more ports forwarding then add more NAT rules. Because this is NAT, you don't need to assign IP 192.168.168.2 to your host. You can even forward different ports up to different host inside your DMZ.
Routing
I like routing but not this time ! This was my first choice for version 1.2.X, but the setting is a little more tricky this time because of
changes in the routing interface !  . Use it only
if you need routing instead.
. Use it only
if you need routing instead.
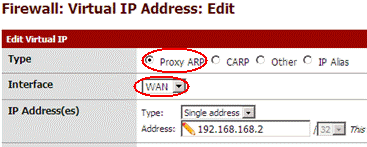
I have to add a route that bring packets for 192.168.168.2 on the WAN side to 10.0.0.2 on the DMZ side. One operation was required using 1.2.X, pfSense 2.0 require 3 ! First add a Proxy Arp entry to reply to ARP request for 192.168.168.2 on the WAN side :
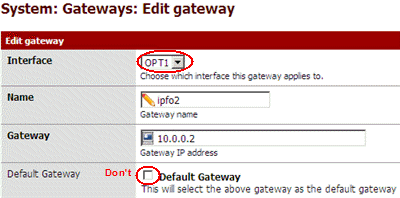
Second, add 10.0.0.2 to the gateway list.
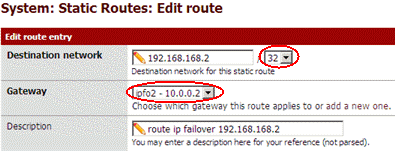
And last, setup the route for host 192.168.168.2 :
Now I have to update filter rules to let traffic for this new address pass trough. Look at 1 on 1 above to see how I do.
Finally don't forget to assign IP 192.168.168.2 to your host.
Routing drawback
The server has 2 IPs. To answer to requests from outside, it will use the same source address as the destination address in the original request. This is fine ! But to open new connections it will choose the IP depending the outgoing route. And because the default gateway is 10.0.0.1, it will use 10.0.0.2. This is not very nice. Some applications accept to force the source IP, but not all. Using source NAT would make the use of 10.0.0.2, useless because replies would always come 192.168.168.2 even if destination was 10.0.0.2 and remote source would not understand why it get reply from 10.0.0.2 instead of 192.168.168.2. Then choose 1 on 1 instead !
That's it
Free Front-end for popular Windows and Linux Backup tools.
Monthly archive
- January 2011 (4)
- February 2011 (10)
- March 2011 (6)
- April 2011 (1)
- May 2011 (1)
- July 2011 (4)
- August 2011 (6)
- September 2011 (5)
- April 2013 (1)
Comments
sepp (not verified)
Sat, 11/24/2012 - 00:37
Permalink
Pfsense, ovh, vmare - installation acces interface
Merci pour ce tutorial.
Comment obtenir l'interface graphique de pfsense dans votre tutorial? quel port?
que faut-il installer et comment y accéder sans WAN et la configuration VM propre à OVH?
comment effectuer cette partie sous pfsense 2.0 pour une VM (1 ip, 1ip failover et 1@mac)?
auto eth0
iface eth0 inet static
address # adresse Failover pour le serveur virtuel
netmask 255.255.255.255
post-up /sbin/ip route add IP-principale.du.Serveur.254 dev eth0 # la gateway du serveur
post-up /sbin/ip route add default via IP-principale.du.Serveur.254
aspineux
Sun, 11/25/2012 - 17:46
Permalink
I'm creating a virtual LAN on
I'm creating a virtual LAN on the ESXi server.
I install one VM with a web browser and connect the VM to this LAN. This can be a Windows, or a Linux, or even faster, a live distribution that is able to run from the ISO without any installation.
I connect the pfSense to this virtual LAN and I manage it from the freshly installed VM.
I'm using the VMware console to remotely manage the Linux or Windows VM and start the web browser to setup the FW.
I don't understand the second part of the question. The debian/ubuntu network setup looks fine. I have not tested it but use an identical setup for fedora/centos
==== /etc/sysconfig/network-scripts/ifcfg-eth0
DEVICE=eth0
BOOTPROTO=static
IPADDR=
NETMASK=255.255.255.255
ONBOOT=yes
=== /etc/sysconfig/network-scripts/route-eth0 ===
# first define a route for the gw
X.X.X.254/32 dev eth0
# then define the default gw using a uncommon way
0.0.0.0/0 via 178.32.119.254
Add new comment