TCP Proxy Reflector
How does it work
Download
License
Installation
Getting started
Authentication
Web Interface
Support
Overview
Tcp Proxy Reflector is a network tool including a client
and a server application providing an exclusive feature.
The server acts as a proxy sitting between a user and a client.
The user activates a forwarder on the server to access one of the
resource available through the connected client. This forwarder forwards
new connections to the client. Then the client forwards the connection up to the local resource.
TCPR, doesn't require custom firewall rules at the client side because
the client initiate the connection to the server and usually firewall don't block
outgoing connections.
TCPR works a little like LogMeIn, TeamViewer or VNCReflector
but not limited to only one kind of application. TCPR can forward any
TCP protocols like SSH, RDP, VNC, HTTP; and manage multiples resources and
multiple connections to each of them.
The server can handle an unlimited number of clients and allows
users to activate forwards individually and enable some access restrictions.
How does it work
TCPR requires to setup a server that will be reachable by the clients and
the users. The server can be any Linux or Windows PC. It can be hosted on the
Internet with a high bandwidth or local with some port forwarding.
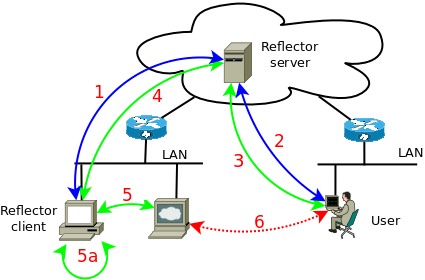
When all is in place, the client (1) connects to
the server and submit a list of available forwards (resources you can access by passing trough it).
A user that want to access one of these resources,
connects to the server, get (2) the list of available
resources, and (2') activate one of them.
The server starts a forwarder listening for connections.
When a user open (3) a connection
with this forwarder, the server (4) creates a
tunnel inside the connection previously established by the client,
and the client open (5) a connection with the target
resource. When done, the user is connected to the target through a
(6) virtual connection going through the server and the client.
The target could be also (5a) local to the
client itself or even somewhere on the Internet !
Features
TCPR has been tested on Windows and Linux system and works on any
platform supporting python 2.4 up to 2.7. A windows .exe file is available at
the download section.
TCPR application and library are released under the term of the GNU GPL.
The python library underneath can be used alone to embed this feature into
your own application or appliance. The feature could be activated at user
request to give the support team a remote access to the application or
other system resources.
TCPR has some build in security: user authentication at server level,
the access to forwarder can be restricted to some IP and for a limited period.
TCPR is not a new security breach in your network. This
kind of feature is already widely used by virused zombie computer !
This is your responsibility to configure your firewall and your WEB proxy to deny
or control this kind of usage !
Installation
TCPR is released as a python package. The package can used as a library or
run as an application. Depending on your OS and your need, you have different way to start it.
The server, the client, the console and the web interface are all included in
the same application and started the same way, using a dedicated option.
Client and server require a .ini containing the configuration.
Windows
Procedures described in the linux section
below can be used too, but the easiest way is to use the .exe files available in the
download section.
Linux
Depending the version of python already installed you have multiple options
to install and start the application:
- Python 2.6 can run .zip and .egg file directly, TCPR is build this way.
- Python 2.5 can run installed package as an application using option -m, TCPR can be run this way too.
- TCPR provides a script file tcpr that should be installed somewhere in your PATH by
the python build-in install process.
Package installation
TCPR is packaged as an source file and registered near the
The Python Package Index.
You can use easy_install
or the more and more popular pip to install it this way:
# easy_install TcpProxyReflector
... or with pip
# pip install TcpProxyReflector
If easy_install is not installed already, install it this way:
# wget http://peak.telecommunity.com/dist/ez_setup.py
# python ez_setup.py
If you don't want to use easy_install or pip, and use the stardart python procedure,
download and unpack the source file, go inside the extracted directory and run:
# python setup.py install
First run
When installed, you should find the command tcpr in your path,
try this :
# which tcpr
/usr/bin/tcpr
# tcpr -h
usage: tcpr -s [ config_file ] # start in server mode"
       tcpr -m [ config_file ] # reset manager password (on server only)
       tcpr -c [ config_file ] # start in client mode
       tcpr [-o] [-u user] [-p password] host port # start in console mode
...
If this doesn't work try to find where the file tcpr has been
installed and use the full path or try prefix the command by the python
interpreter this way:
# python /usr/bin/tcpr -h
...
If you have python 2.6 or above and don't want to install the package on
your host, download the .egg file, and start it this way :
# python TcpProxyReflector-0.1.0-py2.6.egg -h
...
Download
These files can be freely downloaded here.
- TcpProxyReflector-X.X.X.tar.gz : this is the source file. (installable with python setup.py installem>).
- TcpProxyReflector-X.X.X.egg : this file can be run without install by Python 2.6 and above.
- TcpProxyReflector-X.X.X-win32.zip : this one contains a Windows .exe file and some doc.
Fore more on how to use them, look at the Installation section.
License
This program is free software; you can redistribute it and/or modify
it under the terms of the GNU General Public License as published by
the Free Software Foundation; either version 3 of the License, or
(at your option) any later version.
Getting started
For testing purpose, you can run server, client and console on the same host.
The server
The server can be run on any host, the firewall must allow clients to
connect to the reflector port ( default is 2311 ).
Access to the console port ( default is 2312 ) must be permitted to
users to activate forwarders.
The web interface running on port 2313 should be kept off or
restricted to the manager user.
The server require a .ini file with a [server] section.
Extract the sample.ini file from the archive, into tcpr.ini
and modify it to meet your need. The file is self documented.
[server]
listen=0.0.0.0:2311
listen_cmd=192.168.1.11:2312
listen_http=127.0.0.1:2313
reflector=0.0.0.0:52000-52899-52999
#user_db=passwd
alive_interval=60
alive_timeout=300
Start the server this way :
# tcpr -s tcpr.ini
The client
The client need a .ini file with a [client] section.
Extract the sample.ini file from the archive, into tcpr.ini
and modify it to meet your need. The file is self documented.
[client]
server=tcpr.mydomain.com:2311
# clientname=workstation_a
# password=password_a
classname=workstation
forwards=rdp:Remote Desktop:127.0.0.1:3389,
         http:Printer HP 1160:192.168.1.50:80
         ssh:linux server:192.168.1.11:22
Start the client this way :
# tcpr -c tcpr.ini
The console
For a better understanding of the console commands, you can also take a look
at the web interface.
To activate a forward, you need to connect using a console or through the web
interface. Start the console this way :
# tcpr -o tcpr.mydomain.com 2312
Welcome user.manager
type help for help. Dynamic ports (52000-52899) fixed ports (52900-52999).
Command help will list all available commands and give samples.
Make a list of connected clients and available forwards.
>list
workstation f11asx.asxnet.loc 010203040506 192.168.1.20:52794
   #0 rdp Remote Desktop
   #1 http Printer HP 1160
   #2 ssh linux server
250 OK
The first line is composed by: <client_class_name> <client_hostname>
<client_unique_id> <client_ip_address> <client_connection_port>.
Then follow 3 forwards, resources made available by the client.
The number is the Id of the forward, then follow the name
of the protocol and the name of the forward. Now
start forward 0 to activate rdp.
>start 0
250 forwarder listening on 0.0.0.0:52000
>list workstation
workstation f11asx.asxnet.loc 010203040506 192.168.1.20:52794
   #0 rdp Remote Desktop listening on port 52000
   #1 http Printer HP 1160
   #2 ssh linux server
250 OK
You can now connect to port 52000 of your server using your
favorite RDP client and login on your windows station.
You could have started the forwader with some options...
> start 0 84.56.32.45 p=52901 t=30m
250 forwarder listening on 0.0.0.0:52901
...to restrict access to one IP and for 30min only, and allocate the port from the fixed range.
You can also modify restrictions later. Be careful, already active connections
are not impacted by these modifications :
> modify 0 * p=52902 t=0
250 forwarder listening on 0.0.0.0:52902
Even the listening port can be modified without closing active connection,
* allows anybody to connect to the forwarder and t=0 remove any time limit.
You can change one option at a time:
> modify 0 *
> modify 0 p=52902
> modify 0 t=0
Command status give more informations about active forwards and
active connections (tunnels).
> status
reflector<workstation_a@84.56.32.45:52794(workstation,f11asx.asxnet.loc,010203040506)>
   #0 <$0 rdp, Remote Desktop> listening on 0.0.0.0:52000 for 0H29m34s
      ... accepting 84.56.32.45, 0.0.0.0
      >tunnel %0 connection from 84.56.32.45:43156 recv=167K send=12K
   #1 <$1 http,Printer HP 1160>
   #2 <$2 ssh,linux server>
You can stop a forward, keeping connections active but
denying new one, or terminate it to close open tunnels.
 > stop 0
 250 forwarder stopped
Enable authentication
Authentication can be enable to authenticate users and clients.
Connections to active forwarder cannot be authenticated by TCPR.
The user must control and restrict connections from the console. Anyway most
of the protocols going through the forwarders like SSH or RDP
have their own security.
On your server, uncomment the line user_db in the [server] section.
[server]
...
user_db=passwd
...
Replace passwd by the path of your password file.
If not found, the file will be created and a user manager with
password manager added.
If needed, the option -m can be used to change this password like this.
# tcpr -m new_password tcpr.ini
Don't forget to restart the server, then you will connect to
the server, using the console to create some users and clients
accounts, and put them in groups. Only user manager can manage accounts.
# tcpr -o -u manager -p password server.example.com 2312
Welcome user.manager
type help for help. Dynamic ports (52000-52899) fixed ports (52900-52999).

>client add workstation_a password_a group_a
client workstation_a added
>user add user1 password1 group_a
user user1 added
>group list
group_a client.workstation_a user.user1
You can see group_a has 2 members, one client and one user. Users can
only manage clients sharing the same group. The same account can be used by
multiple client and a user can login multiple time, from multiple hosts.
Now you must add credential to the .ini file of your client.
[client]
...
clientname=workstation_a
password=password_a
...
After having restarted the client, you can login using the console with
your new user account:
# tcpr -o -u user1 -p password1 server.example.com 2312
...
.. and activate forwarders.
The WEB interface
The WEB interface is not secure in any way, no authentication and no encryption,
you must keep it turned off or secured by firewall rules or other trick. Any way
the nice screen help to understand the way the application works and understand
the console interface. Uncomment the line listen_http
to activate the interface, use 0.0.0.0 to listen on any interface or choose an
appropriate IP address.
listen_http=0.0.0.0:2313
Don't forget to restart the server !
The interface display a list of connected clients in orange
and all available forwards in blue when stopped or green when started.
If you have a lot of clients, you can filter them (1A)
on the class name or choose to display only one (1B)
client at a time.
Before to start a forward, you must setup the (2) parameters:
- The host that will access the forward, type its IP,
hostname or use * for any. The default is the host from wich your
are browsing the interface. - You can choose the port from a fixed range or let the
field empty to let the system allocate one from the dynamic range. - If you want to limit the time the forward will be active,
type a time followed by one letter s, m, h, or d for seconds, minutes, hours or days.
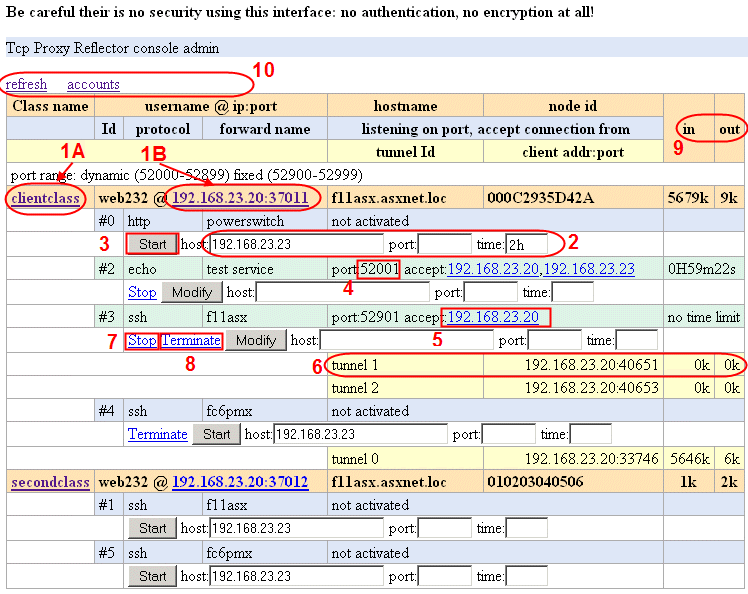
Click the (3) Start button to
start the forward. The forward switch to green and
display the (4) port it is listening on,
waiting for connections.
You can add more hosts to the list, change the port or change
the time limit using the Modify button. You can also
remove host IP by clicking (5) on the address.
When a user connect to the forwarder, a tunnel is open, in (6) yellow.
You can (7) Stop the forwarder and keep the tunnels open
or (8) Terminate it and close all open tunnels.
On the right side, you can see the (9) traffics in Kbytes.
If keep alive is enable, the counters will slowly increase with time.
On the top you can (10) refresh the screen,
display all the connected client if a filter is active, or
display a list of all the accounts: users, clients and groups.
It is not possible to manage accounts from this interface,
you must use the console interface.
Start it as a service
TCPR client and server are very similar and can be started the same way. If
you want to make them run forever on your Linux or your Windows host, here are
the tricks.
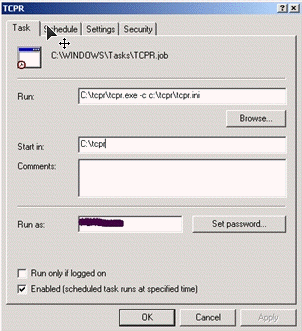
Windows
Today TCPR has no service extensions for Windows.
If you want to make it run forever on you Windows host look at this
tips
You need to choose a location for your .ini file, your log files and
maybe the password file also. When done create a new taks like this one :
Linux
The easiest way to run the program forever, is to start it from the
rc.local file usually found in /etc or /etc/rc.d
directory.
Create your tcpr.ini file in /etc/tcpr and be sure it is
not world readable, because it can contain credentials. If started in server
mode with authentication enable, you could put your password file there in
/etc/tcpr/passwd. Don't forget to setup user_db in
tcpr.ini
mkdir /etc/tcpr
cp sample.ini /etc/tcpr/tcpr.ini
chmod 600 /etc/tcpr/tcpr.ini
Then create script /usr/local/sbin/tcpr.sh
that will restart the program if ever it crash.
#!/bin/sh

# select the way you start tcpr
TCPR="/usr/bin/tcpr"
#TCPR="python -m tcprlib"
#TCPR="python /usr/local/lib/TcpProxyReflector-0.1.0-py2.6.egg"

# go in a safe place
cd /tmp

#run it forever
while /bin/true; do
    # use -c for client and -s for server mode
    $TCPR -c /etc/tcpr.ini
    # the 60sec delay allow to not burn the CPU if the program crash continuously
    sleep 60
done
At the end of the rc.local file add this line to start it at
each boot.
sh /usr/local/sbin/tcpr.sh > /dev/null 2> /dev/null &
Run the command manually to start TCPR.
Logging
TCPR use the Python standard library logger module. The default is to
display the log to the standard error (stderr), but it is possible to redirect
the log to a rotating file or the linux syslog service or
even the windows EventLog. This can be done in the .ini file
using the appropriate
file format. If at least one of the tree section
[loggers], [handlers] or [formatters] is missing,
the program will ignore the logging configuration and display log to the console.
For a long running process, I recommend to activate Rotating Log
and disable console output. Modify the handlers option
from default to rotatingfile and modify the
[handler_rotatingfile] to meet your need.
...
[logger_root]
level=NOTSET
handlers=rotatingfile
...
[handler_rotatingfile]
class=handlers.RotatingFileHandler
level=INFO
formatter=default
# filename will be '/var/log/tcpr.log'
# log will be in (a)ppend mode
# max file size will be 50k
# file will be numbered up to 5 for a total of 250k
args=('C:\tcpr\tcpr.log', 'a', 50000, 5)
...
Alternative
TCPR could be compared to the network Swiss Army knife
Netcat. But if netcat is fare
more flexible, it cannot do things dynamically.
Anyway both are unique tools in the network landscape.
The closest existing software is SSH with its forward capability,
option -R, but it is not dynamic like TCPR and requires to
pre-assign ports for each clients.
It is not possible to control the access to the
forwarded port that are always active and world reachable.
Usage sample
Here are some kind of situation where TCPR could be useful.
Cannot run Logmein
You need a remote access to a workstation and cannot install or
run LogMeIn ! Send all the configuration files and TCPR to your remote
user and ask him to start the client ! Enable the forwarder on the
server and connect to it to access the workstation remotely.
Web developer
You are a web developer and you are in a meeting with one customer.
You get a call, another customer want to show the site you are developing
for him. The last version of the web site is running on your laptop,
and only on your laptop ! You have one minute to give him an access !
Start a TCPR client on your laptop, activate a forwarder on the server, and
send the URL to your raring customer !
DB manager
You are remotely connected to a Windows box running SQLServer.
You need to access the DB from some applications installed on you laptop and
don't want to install or cannot install them on the remote server.
On the remote server download TCPR and start it to forward port 1433.
Start your applications open the DB via the server forwarder.
Web developer, the full story
You are a web developer and you are in a meeting with one customer.
You get a call, another customer want to show the site you are developing
for him. The last version of the web site is running on your laptop,
and only on your laptop !
First start the TPR client on your laptop. Open a command prompt
and type the command :
C:\> cd tcpr
C:\tcpr> tcpr -c tcpr.ini
For reminder here is the .ini file you have setup long time ago.
[client]
server=tcpr.mydomain.com:2311
clientname=workstation_a
password=password_a
classname=laptop
forwards=http:My laptop:127.0.0.1:80
To activate the forwarder on the server, login using the console, fint your
the id of the forward
C:\> tcpr -o -u manager -p password tcpr.mydomain.com 2312
>list
laptop mylaptop.mydomain.com 010203040506 62.168.41.120:52794
   #0 http My laptop
250 OK
and start forward 0.
>start 0
250 forwarder listening on 0.0.0.0:52902
The web server running on your laptop is now available from
tcpr.mydomain.com on port 52900.
Test the URL in your browser and send the link to your customer.
That's It !
The origin of TCPR
I remember a multi-purpose Linux appliance doing firewall, file server,
mail server and more.
This appliance had a check box "Let company staff manage this box
remotely". Their was nothing to configure on the firewall, this was
easy.
I tried to reproduce this easiness for my own appliance !
But the library I have developed allows more than a simple remote access and I
decided to write a user friendly application around it.
If you still don't understand what it is !
This is a kind of LogmeIn or TeamViewer stuff, but not limited to only
connect to the Windows Graphical screen of your PC. TCPR gives access
to any TCP protocol based application running on the target host but also
to every other hosts on the LAN or even Internet.
For short, this work by having a server on the Internet running the TCPR server.
TCPR clients connect to the server and publish the resources
you can access going through them. Connect to the server using the TCPR console
or the unsecured web interface and activate some of the available resources.
The system give you a port on the server that will be forwarded to the
target. Use the appropriate network client application to connect to this port.
Thats'it !
Support
For any questions, go here
Free Front-end for popular Windows and Linux Backup tools.
Monthly archive
- January 2011 (4)
- February 2011 (10)
- March 2011 (6)
- April 2011 (1)
- May 2011 (1)
- July 2011 (4)
- August 2011 (6)
- September 2011 (5)
- April 2013 (1)